Friday, 29 October 2010

A traditional Father Christmas Card

Hi folks! Here's a jolly Father Christmas card I made using the recently released 'Times Gone By' CDrom by Glynn Williams.
The sweet tinsel backing paper is printed from the CD which I added some gold Stickles to. I punched the corners with my Crop-a-dile corner Chomper (Stub design). I layered the tinsel paper onto some Mirri board and added some deep red self adhesive pearls to the corners. I embellished the main image with some holly leaves cut using a Quickutz die, some flat back plastic beads for the berries and a sparkly gold ribbon bow.
It's another sample card I sent to Joanna Sheen... alas I have yet to start my own Christmas cards!!! Best get cracking on those!!
Ciao for now!
Sandra x

Tuesday, 26 October 2010

'Strictly' Christmas ;o)

Hello folks! So sorry that I have been such a bad blogger of late. Life has just swept me along. I won't bore you with all the details but I will share that I was lucky enough to be in the studio audience of Strictly Come Dancing this week. Hubby and I had really enjoyed the whole experience. What a week to go.... window boxes, unicycles, and the amaaaaaaazing flying starship-Widdicombe.
Anyway, back to craft.... I printed this glorious winter scene from Glynn Williams 'Times Gone By' CDrom onto photo quality gloss paper. I cut out the layers and decoupaged them using dimensional glue gel. I added some highlights with my Stickles glitter glue (you can see this better on the first picture) I layered the decoupage onto some sliver mirri card.
I wanted to keep the card quite simple so I used white velvet paper on the background. I really love the luxurious texture the velvet paper gives. But then I couldn't leave the design alone so I added the white ribbon (thank goodness for thin double sided tape) and then went completely OTT and added all the self adhesive gems. Sometimes I think I should learn to 'step away from the card'. I would love to make more clean and simple cards.
Here's a pic on the inside. The paper again was printed from the CDrom. I chopped out some of the bricks from the insert paper, rubbed the cardstock with some antique linen ink and adhered the insert on top.
I'll try not to leave it soooooo long before my next post. I am beavering away at my craft desk working on something very exciting being released by Joanna Sheen next month. I don't like teasing but I'm hoping you'll forgive me this time.
Ciao for now!
Sandra x

Saturday, 16 October 2010

Get Better Really Soon!

Hi folks! Hope you have all had a great week. Here's a card I haven't shared with you yet. I made it using the really cute 'Get Better Really Soon' Stamp set by the Giordano Studios.
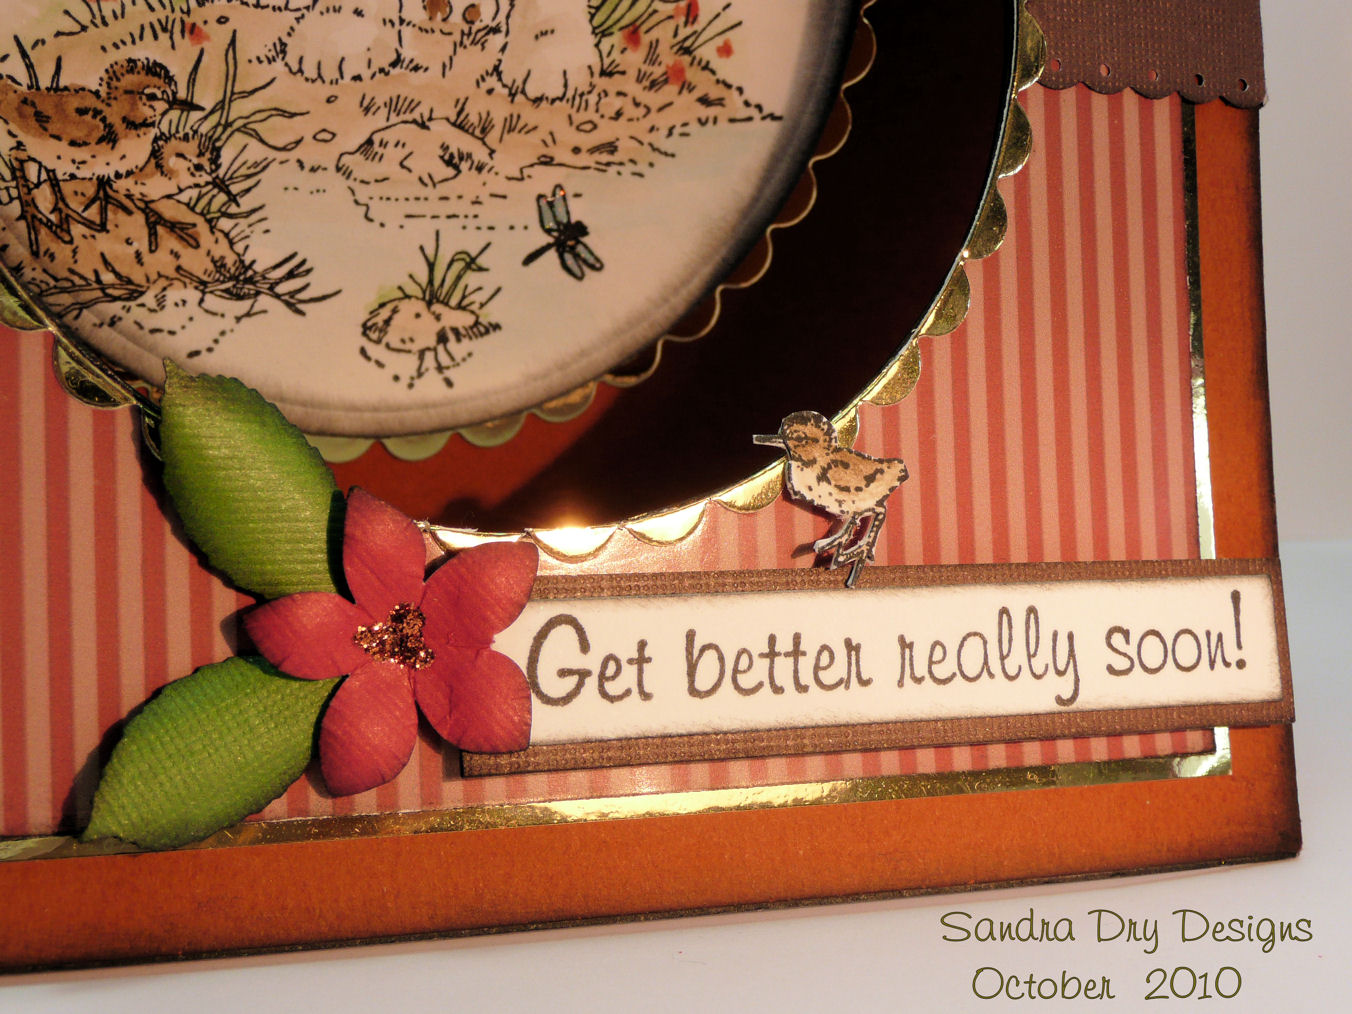
The card itself is a very simple design. A bit of matting and layering (the stripy paper is printed from the Giordano Puppies and Kittens CDrom) a gold scalloped circle added as the final layer and then I die cut the aperture with a circle Nestability.
I watercoloured the image using Lyra aqua colour crayons and added glossy accents to the puppies eyes and nose.
The sentiment is stamped from the set and the leaves and flowers are made using Martha Stewart punches. A dab of gold Stickles in the centre of the flowers is the finishing touch.
Ok... will have to dash... kiddies hungry... need to make lunch!
Hugs to all
Sandra x

Saturday, 9 October 2010

Autumn Leaves...


Hi folks! Wow what a gorgeous day we are having today. The sun is shining and it's t-shirt weather again... big smiles all round :o) I made this card using stamps from the House Mouse Designs Autumn collection, from the plate called 'Leaves'.
The cute image reminded me of a lattice frame shape that I have on my Cricut Gypsy. I die cut one in brown card to use in the background over some Provocraft patterned paper (have had this stack in my stash for years!) I stamped the image and coloured it in with Prismacolour pencils and Sansodor. I then carefully cut the image out with a craft knife. I measured and cut a gold frame for the image.... with a good old fashioned ruler and craft knife. I tied three brown sheer ribbon knots to the frame before adhering to the background with foam tape to add dimension. The flowers are by Prima and I added gems to the centres. The leaves are punched using a Martha Stewart punch.
I had a small strip of the backing paper left so I thought I would put it to good use inside the card. I cut the leaf on my Cricut; the stamped sentiment is also from the 'Leaves' stamp plate; I tied more ribbon to the leaf and distressed the edges with ink. Lots of space on this one for the sender to write their message.
Ciao for now!
Sandra x

Stamp Something - Something Punchy
Stampin' for the weekend - Autumn Inspiration
Charisma Cardz - Autumn colours
Creative Card Crew - Bloomin' Marvellous

Thursday, 7 October 2010

A 'New Home' card

Hi folks! As you probably know by now I'm not one for following trends and I'm way behind with this one. Can you believe this is my first Easel Card! It was really fun to create and I can see why everyone loves to make them so much. It's quite a diddy card only measuring about 4.5 inch square when folded down.
I printed off the easel card from the Seraphina & Friends CDrom and made up as per instructions, which included the decoupage. I just added some ribbon bows, glittered the flowers and added some self adhesive pearls for a finishing touch.
Ciao for now!
Sandra x

Tuesday, 5 October 2010

Phew.... a House Mouse stinker!!

Hi folks! Here's another House Mouse card. This time with a cute image from the the 'Berry' stamp set. I stamped the image with smoky grey versafine ink and coloured it with my Prisma colour pencils and Sansodor. The next layer is a piece of brown card that I spritzed with Gold Mica Mist and attacked with a small scalloped border punch (EK Success). The base layer is some crumpled up Kraft paper that I flattened out and gently rubbed some black ink over.
I folded over a piece of patterned paper and used a different scallop border punch to create the fancy edge. I adhered this to the edge of the card and used my Cinch to create the holes. I added lots of ribbon, both sheer and textured, to the card and finished it off with some self adhesive pearls.
The inside of the card is just more patterned paper, some stamping (the sentiment is also from the set) and layering up using Nestabilities.
Ciao for now!
Sandra x

Totally Papercrafts - The great outdoors
Crafty Cardmakers - Step away from the square
Stamp, Scrap and Doodle Saturdays - Open Challenge
Sweet Stampin Challenge - Punch it Out
Stampin' for the weekend - Autumn


Friday, 1 October 2010

Marsh Orchid card

Hi folks! Here's another card I made for the launch of Joanna Sheen's water flower rubber stamp collection. For this card I used the stamps from the 'Marsh Orchid' which has the lovely Kingfisher image included.
The papers are by DCWV. I stamped the images and watercoloured them. I used a tag die to cut out the kingfisher and matted the main image on silver mirri card. I trimmed the card with ribbon and a bow.
Have a great weekend!
Ciao for now
Sandra x